# TLS-related settings if you want to enable TLS directly. tls:false cert:cert.pem key:key.pem
# Prefix to apply to the WebDAV path-ing. Default is '/'. prefix:/
# Enable or disable debug logging. Default is 'false'. debug:false
# Disable sniffing the files to detect their content type. Default is 'false'. noSniff:false
# Whether the server runs behind a trusted proxy or not. When this is true, # the header X-Forwarded-For will be used for logging the remote addresses # of logging attempts (if available). behindProxy:true
# The directory that will be able to be accessed by the users when connecting. # This directory will be used by users unless they have their own 'directory' defined. # Default is '.' (current directory). directory:/data
# The default permissions for users. This is a case insensitive option. Possible # permissions: C (Create), R (Read), U (Update), D (Delete). You can combine multiple # permissions. For example, to allow to read and create, set "RC". Default is "R". permissions:R
# The default permissions rules for users. Default is none. Rules are applied # from last to first, that is, the first rule that matches the request, starting # from the end, will be applied to the request. Rule paths are always relative to # the user's directory. rules: []
# The behavior of redefining the rules for users. It can be: # - overwrite: when a user has rules defined, these will overwrite any global # rules already defined. That is, the global rules are not applicable to the # user. # - append: when a user has rules defined, these will be appended to the global # rules already defined. That is, for this user, their own specific rules will # be checked first, and then the global rules. # Default is 'overwrite'. rulesBehavior:overwrite
# Logging configuration log: # Logging format ('console', 'json'). Default is 'console'. format:console # Enable or disable colors. Default is 'true'. Only applied if format is 'console'. colors:true # Logging outputs. You can have more than one output. Default is only 'stderr'. outputs: -stderr
# CORS configuration cors: # Whether or not CORS configuration should be applied. Default is 'false'. enabled:true credentials:true allowed_headers: -Depth allowed_hosts: -http://localhost:8080 allowed_methods: -GET exposed_headers: -Content-Length -Content-Range
# The list of users. If the list is empty, then there will be no authentication. # Otherwise, basic authentication will automatically be configured. # # If you're delegating the authentication to a different service, you can proxy # the username using basic authentication, and then disable webdav's password # check using the option: # # noPassword: true users: # Example 'admin' user with plaintext password. -username:admin password:admin # Example 'john' user with bcrypt encrypted password, with custom directory. # You can generate a bcrypt-encrypted password by using the 'webdav bcrypt' # command lint utility. -username:john password:"{bcrypt}$2y$10$zEP6oofmXFeHaeMfBNLnP.DO8m.H.Mwhd24/TOX2MWLxAExXi4qgi" directory:/another/path # Example user whose details will be picked up from the environment. -username:"{env}ENV_USERNAME" password:"{env}ENV_PASSWORD" -username:basic password:basic # Override default permissions. permissions:CRUD rules: # With this rule, the user CANNOT access {user directory}/some/files. -path:/some/file permissions:none # With this rule, the user CAN create, read, update and delete within # {user directory}/public/access. -path:/public/access/ permissions:CRUD # With this rule, the user CAN read and update all files ending with .js. # It uses a regular expression. -regex:"^.+.js$" permissions:RU
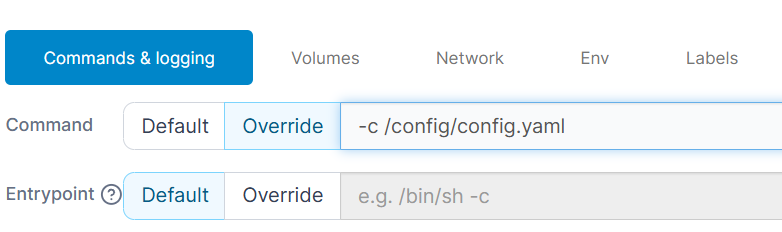
创建容器
与多数 docker 容器创建相同,值得注意的是要将 config.yaml 所在目录映射进容器,并在启动参数指定 c 为容器内 config.yaml。